Timeshift Tutorial (System Snapshots, Rollback, and Grub Implementation)
Credits: @P_J
![]()
Basic Timeshift how-to
The base installation of Timeshift is as simple as
sudo dnf install timeshift
It will create snapshot on command using both CLI commands and through the User Interface. It is extremely easy to use and the tutorial from Linux Mint is good enough.
Essential Setup
After installing the Timeshift package, start the program from the SuperMenu, and it will immediately launch into a Wizard to setup the system. Completing this wizard will setup the program with its essential functions.
Automation
To allow Timeshift to run automatic backup routines (to take snapshots of the base system) and retention strategies (to keep certain snapshots over a period of time, e.g. 1 monthly, 2 weekly, 3 days, 4 boots, etc.) a user will have to enable the crond service as timeshift relies on it to automate. Active it by using:
sudo systemctl enable --now crond.service
Now, Timeshift will automatically run as you have instructed it in the initial setup wizard if you have already done so after installing and running the GUI for the first time.
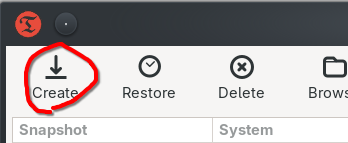
Have Timeshift create one snapshot
This is necessary for later steps to be successful
Recovering from a backup
This video explains the process in a straightforward way:
System Recovery with Timeshift and Snapshots
On File System Types
At the basic level, Timeshift will work with various file systems, such as EXT4, BTRFS, XFS, etc. On any file system type it can run RSYNC commands to backup essential (system) packages. However, this will take a lot of space. On the BTRFS file system, it has the option of running backups using BTRFS features. This is extremely fast and backups are much, much smaller, as BTRFS uses a feature called “copy on write,” which means that it will create snapshots of only those files which are changed or deleted in a snapshot. Whatever one chooses, the ability to do a system restore is a valuable function.
Further Implementation by system restore snapshots
Timeshift can be further implemented, however, to include system snapshots whenever there is a system change committed by updating, installing, or removing packages.
Necessary Packages
It will require a few extra packages and some configuring, but it is very easy to get up and running.
First, you must install DNF5, as the plugin for the snapshots on updates, install, and package removal relies on the newest version of DNF:
sudo dnf install dnf5
This means that all future package transactions must take place using sudo dnf5, and not just sudo dnf. Users may find it difficult to remember to always perform updates this way. Moreover, some system tools will call for dnf and will not use dnf5. Therefore, there are two options for users. Please review both before making your decision
Aliasing
Some usersit advantageous to create aliases in their bashrc files to make all future dnf commands to be interpreted in the terminal as dnf5 commands:
echo 'alias dnf="dnf5"' >> /home/$USER/.bashrc && echo 'alias sudo="sudo "' >> /home/$USER/.bashrc && exec bash
The first alias creates an alias for dnf so that it always runs as dnf5. The sudo command, however, does not recognize aliasing unless the second alias is also implemented. The final exec bash commands simply makes the current terminal reload the .bashrc file in order to implement the new aliases in the current terminal (any other open terminals will either have to be closed and reopened, or the user must run exec bash in them in order to reload the new aliases into those running terminals.)
This is very simple, but doesn’t always ensure that all dnf calls will be run as dnf5. Some users may prefer a more robust method that enforces dnf5 system-wide.
![]() This system-wide implementation of
This system-wide implementation of DNF5 is not an official suggestion from OMLx, if you do this after you have set your system up, certain system tools will not respond properly, such as the repository picker. If you have already set up your system, this should not be a problem, but it is not yet known how many such tools may be effected by this method. This will all change, of course, once OMLx has fully implemented DNF5, and the aliasing method does work and doesn’t seem to have the same “adverse” effect on other system tools. Therefore, users are advised to be carefuly in their decision.![]()
DNF5 System-Wide
ZZ-Top innuendos aside, if you look into your system, you will find that when you run dnf in the terminal, you aren’t actually running a binary directly. Instead, dnf links to a binary.
If you run this command,
cd ~ && tree /usr/bin/ -P dnf*
you should see something like this:
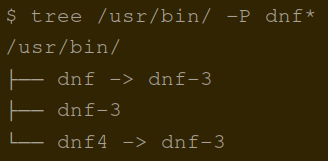
What this shows: the command dnf, as run in the terminal, is not actually a binary. The right-facing arrows reprsent symlinks that show what the dnf command is actually calling. As you can see, when the average OMLx user calls dnf or even dnf4 they are actually calling dnf-3. For those who want to implement dnf5 system wide, this presents very exciting possibilities since one just has to remove the old symlink and create a new symlink that will point to the actual binary of dnf5, and TADA, the system will use dnf5 whenever dnf is called. How awesome is that!
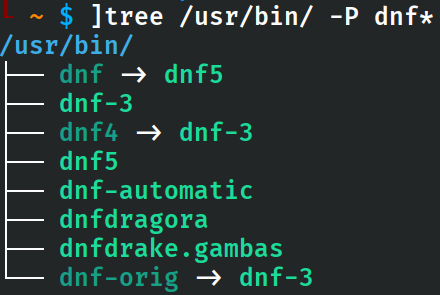
This is what it will look like after the change:
Here is the process:
cd /usr/bin && sudo mv dnf dnf-orig && sudo ln -s dnf5 dnf
In doing this, we’ve made a “backup” of the original symlink, dnf, as dnf-org. Now all system calls to dnf will run the dnf5 binary.
Caveat
Certain tools like DNFDrake and DNFDragora use internal dnf binaries, so far as I can tell, to install packages. They will not work in the snapshotting process. The OMLx System Update, however, will work perfectly, as will updating in the terminal

or
sudo dnf clean all;sudo dnf distro-sync --refresh --allowerasing
Concluding statement on DNF5
I would not suggest doing both aliasing AND symlinking.
Now that we have ensured that we will always use DNF5, we need to install some basic packages for the DNF5 plugin we’ll use to automate snapshotting at upgrades, installs, and package removals. Here are the packages:
sudo dnf install git make
Having installed these packages, now clone the essential file:
git clone https://github.com/CalliopeSystem/timeshift-autosnap-dnf5.git
Now, navigate in the folder:
cd /home/$USER/timeshift-autosnap-dnf5
and run:
sudo make install
If you want the snapshots to store more than 3 backups for system changes, do the following with your editor of choice:
sudo nano /etc/timeshift-autosnap-dnf5.conf
Change the bottom-most variable, maxSnapshots, to your desired value (e.g. 10)
maxSnapshots=10
Press ctrl+s to save the file and press ctrl+x to leave the file.
Conclusion on Implementation of Automatic Snapshots for Upgrades, Installs, and Removals
Now, Timeshift will automatically take snapshots on system changes. At this point, your system is very well set up for insurance against changes to the system which may make it difficult to use or boot in some cases, especially if one follows the instructions in the video previously referenced.
Implementing Bootable System Snapshots with BTRFS
Using Timeshift, BTRFS, and other packages, a user can utilize system snapshots in the bootloader (GRUB) so that not only are backups made whenever there is a system change committed by updating, installing, or removing packages, but those snapshots can be made into boot options. In this way, if an installed package or update makes a system unbootable or difficult, a user can simply select a snapshot in the bootloader and rollback changes that have been made.
This exciting feature is able to be implemented in OMLx using the next steps of this guide.
Users MUST FOLLOW the previous steps up to this point in order to implement the automation and inclusion of snapshots into the grub menu. The rest of this process we will now describe.
First, users must install the base packages:
sudo dnf install btrfs-progs gawk inotify-tools grub-btrfs
Most users of OMLx will already have the first two packages. Now, edit the configuration for grub-btrfs:
sudo nano /etc/default/grub-btrfs/config
Because OMLx is setup with grub2, for snapshots to work, we will need to uncomment lines 101, 133, 139.
For those using nano, press ctrl+/ and type in 101 and press enter on your keyboard. Now remove the # from the beginning of the line, thus uncommenting it. Repeat these steps for 133 and 139. In order, the following lines should now be uncommented:
GRUB_BTRFS_GRUB_DIRNAME=“/boot/grub2”
GRUB_BTRFS_MKCONFIG=/usr/bin/grub2-mkconfig
GRUB_BTRFS_SCRIPT_CHECK=grub2-script-check
Press ctrl+s to save the file and press ctrl+x to leave the file.
Now edit the system service:
sudo systemctl edit --full grub-btrfsd
And, finding the line which says
ExecStart=/usr/bin/grub-btrfsd --syslog /.snapshots
replace it with:
ExecStart=/usr/bin/grub-btrfsd --syslog --timeshift-auto
Save and close the editor. Now, reload the systemd daemon:
sudo systemctl daemon-reload
We’re ready to activate the snapshotting system that will ultimately notify grub to integrate new snapshots into the grub menu. Activate this service by running:
sudo systemctl enable --now grub-btrfsd
Now run,
sudo /etc/grub.d/41_snapshots-btrfs
Then run:
sudo grub2-mkconfig -o /boot/grub2/grub.cfg
And this may not be necessary, but run this again:
sudo /etc/grub.d/41_snapshots-btrfs
Repeating this step should avoid any problems.
Grub will have to be reconfigured to operate properly, therefore, do the following:
sudo grub2-install --boot-directory=/boot --efi-directory=/boot/efi
This should reinstall grub as configured by default. If you have changed a lot of your grub paramaters outside of their normal and default values, this may not work. If, however, you’ve installed your OMLx system as per usual, then this should be perfectly fine. This should complete successfully.
Now, everything having been done, your system should have a new entry on the bottom of the grub menu entitled OpenMandriva Lx Snapshots with your snapshots inside them.
Booting from a snapshot
Users must be careful when booting into a snapshot. Unlike other snapshot systems, booting from a timeshift snapshot is not read only. This means you will boot into a working system. However, changes made in this state will be lost on reboot because the user is still only in a snapshot and not a restored system.
The purpose of booting into a snapshot is to verify that it is working correctly and then restore to that snapshot.
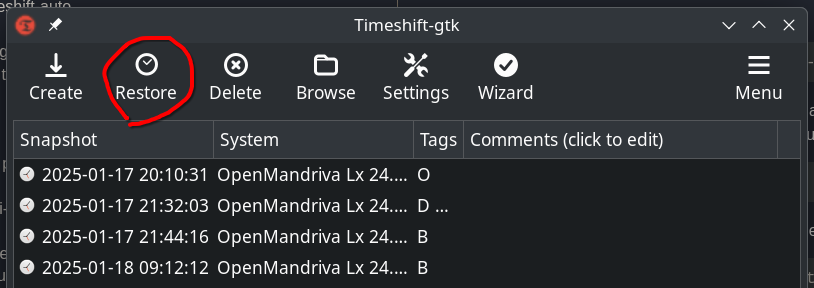
Once a user has verified that a system is working correctly or to their liking, start the Timeshift program, select the preferred snapshot, and ask the program to restore it
On reboot, the user will be in a fully operational and working environment.
Resources:
https://linuxmint-installation-guide.readthedocs.io/en/latest/timeshift.html
https://github.com/KittehCream/timeshift-autosnap-dnf5
https://github.com/Antynea/grub-btrfs/blob/master/README.md#️-installation
https://odysee.com/@EF-TechMadeSimple:3/system-recovery-with-timeshift-and:c